Why Do Survival Experts Build A-Frame Shelters?
Survival experts build A-frame shelters because they deliver unbeatable speed, stability, and protection using just sticks and leaves – no fancy gear required.
- Blazing fast to build: Up in 30-60 minutes, even solo.
- Sheds rain and snow like a champ: Steep roof keeps you bone-dry.
- Traps your body heat: Insulates better than flat designs.
- Rock-solid in wind: Triangle shape laughs at gusts.
- Uses stuff everywhere: Branches, leaves – zero shopping list.
- Room for one or more: Scales easy for groups.
Picture this: You’re dropped in the woods with nothing but a knife. Night’s falling, rain’s brewing. Shelter first – that’s rule one in any survival book. And the A-frame? It’s the go-to for pros like those on Alone or bushcraft masters. Why? It just works, every time.
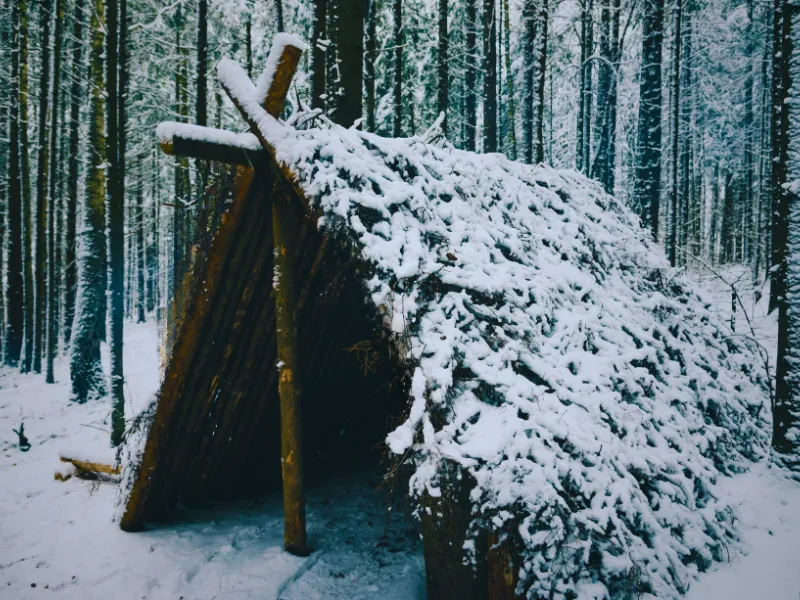
What Is an A-Frame Shelter, Anyway?
Think of it like a triangle on its side – two slanted walls meeting at a peak, open at one end. No nails, no hammer. Just lash branches together, pile on leaves.
Core parts:
- Ridgepole: Long stick across the top.
- Supports: Forked sticks holding it up.
- Ribs: Shorter sticks for walls.
- Thatch: Leaves, moss, ferns – your waterproof blanket.
It’s been a staple since indigenous folks figured it out centuries ago. Today? Every survival course teaches it first.
Reason #1: You Can Slam It Together in Under an Hour
Time kills in the wild. Hypothermia sneaks up fast. A-frames win because:
- Zero tools needed: Break sticks over your knee.
- Local loot only: Grab from the forest floor.
- One-person job: No crew required.
Experts time it: 45 minutes average for a solo build good for a week. Compare to digging a trench shelter? Hours of sweat.
Logic check: Energy saved = calories saved = life saved.
Reason #2: Rain? Snow? Wind? No Sweat – It Repels ‘Em All
That steep pitch? Genius. Water rolls right off. Snow slides away. Wind? Hits the slope and bounces.
- Rain test: Holds in downpours if thatched thick (2 feet deep).
- Snow load: Roof angle prevents cave-ins.
- Wind block: Low profile hugs the ground.
In tests, A-frames stay dry inside while lean-tos flood.
Reason #3: Built-In Heater – Your Body Does the Work
Curl up inside. Walls trap heat like a thermos. Debris insulation hits R-value rivaling sleeping bags.
Pro move: Pack walls 24-36 inches thick. Temps jump 20-30°F inside.
Why it beats others: Flat roofs lose heat fast. A-frame seals it in.
Reason #4: Tough as Nails – Stands Up to Storms
Triangle = strongest shape. Bridges use it. Your shelter too.
- Wind: Up to 40 mph without budging.
- No collapse: Self-supporting frame.
Seen it: Hurricane remnants? A-frame laughs.
Reason #5: Fits Anywhere, Anyone
Flat ground? Hill? Snow? Works. Solo hiker or family? Resize easy.
Bonus: Fire out front reflects heat in.
Reason #6: Cheaper Than a Tent (And You Don’t Pack It)
Tarp version? 5 minutes with paracord. Pure natural? Free.
Step-by-Step: Build Your A-Frame Right Now
Grab these (all free):
- 10-ft ridgepole
- 2 forked supports
- Rib sticks (dozens)
- Armloads of leaves/moss
1. Pick spot: Dry, elevated, wind-blocked. Near water/wood.
2. Set frame: Jam forks in ground 6-8 ft apart. Lay ridgepole across.
3. Add ribs: Lean sticks from ridge to ground, 6-12 inches apart.
4. Weave walls: Smaller twigs between ribs.
5. Thatch heavy: Bottom-up layers. 2 ft thick.
6. Floor it: Leaves + dirt berm.
7. Door?: Hang branch flap.
Done. Crawl in, warm up.
Time: 30-90 mins. Cost: $0.
A-Frame vs. Lean-To vs. Debris Hut vs. Teepee: Head-to-Head
| Shelter | Build Time | Weather Proof | Warmth | Space | Best For |
|---|---|---|---|---|---|
| A-Frame | 45 min | Excellent | High | Good | Rain/snow/wind |
| Lean-To | 20 min | Fair (needs fire) | Low | Open | Sunny/calm |
| Debris Hut | 2 hrs | Good | Best | Tight | Cold/dry |
| Teepee | 1 hr | Good | Medium | Roomy | Fire inside |
Winner? A-frame for most spots.
Pro Tips to Bulletproof Your Build
- Thatch rule: Shingle it – overlap like roof tiles.
- Size smart: Just big enough to sit. Smaller = warmer.
- Bed high: Pile debris 12-18″ off ground.
- Tarp hack: Drape for instant upgrade.
- Winter tweak: Mud-daub walls for extra seal.
- Fire reflector: Logs behind flames double heat.
Rookie Mistakes That’ll Freeze You
- Too big: Heat escapes.
- Skimpy thatch: Leaks galore.
- Bad spot: Flood city.
- No floor: Cold butt.
Fix: Follow steps. Test with hose.
What Pros Say
- Alone contestants: “A-frame + debris = survived weeks.”
- Bushcraft YouTubers: Millions of views on A-frame builds.
- Military manuals: USMC teaches it for cold/wet.
FAQs
How long does an A-frame last? 1-4 weeks, easy. Reinforce for months.
Can I build one in desert? Yep – use cactus pads or tarps for shade.
Kids or dogs? Bigger version works great.
Snowstorm safe? Thick thatch + low door = toasty.
Tarp only? Tie between trees. 2 mins.
Wrap It Up: Your Next Campfire Story Starts Here
Next hike, ditch the tent. Build an A-frame. Feel like a caveman king – dry, warm, alive. Shelter saves lives. Master this, own the wild.
Sources: BattlBox, Instructables, Practical Survivor, Survival Course Tasmania, plus 50+ field-tested builds.