What is the Most Efficient Shelter Design for Heavy Rain?
The closed-end A-frame tarp shelter, pitched at a 45-60 degree angle from the ridgeline, is hands-down the most efficient design for heavy rain.
It sheds water like a duck’s back, blocks wind-driven sheets of rain on three sides, sets up in under 10 minutes, and keeps you bone-dry even in downpours that last days. Survival pros from shows like Alone swear by it, and it’s the go-to for backpackers in places like the Pacific Northwest where rain is relentless.
Whether you’re lost in the woods, camping in a storm, or prepping for emergencies, this setup saves lives. Without proper shelter, exposure to wet cold can drop your core temp fast—around 700 Americans die from hypothermia yearly, many caught without cover in rain.
Let’s break it down.
How to Set Up an Ultralight Tarp Shelter for Backpacking …
Why the Closed-End A-Frame Beats Everything Else
Picture this: Rain hammers down at 2 inches per hour, wind gusting 30 mph. A flat tarp? Pools and leaks. Open lean-to? Wind blasts rain right in your face.
The closed-end A-frame changes the game because:
- Steep pitch (45-60°): Water races off faster than it can soak through. Shallower angles let it pool; steeper fights wind lift.
- Three-sided enclosure: Back and one end seal out sideways rain—perfect for prevailing winds.
- Low profile: Hugs the ground, cuts wind resistance by 50% compared to high setups.
- Versatile: Works solo or duo, with room for gear.
In tests by ultralight campers, it stayed 100% dry through 48-hour storms where lean-tos failed. Bushcrafters on Reddit call it “bulletproof.”
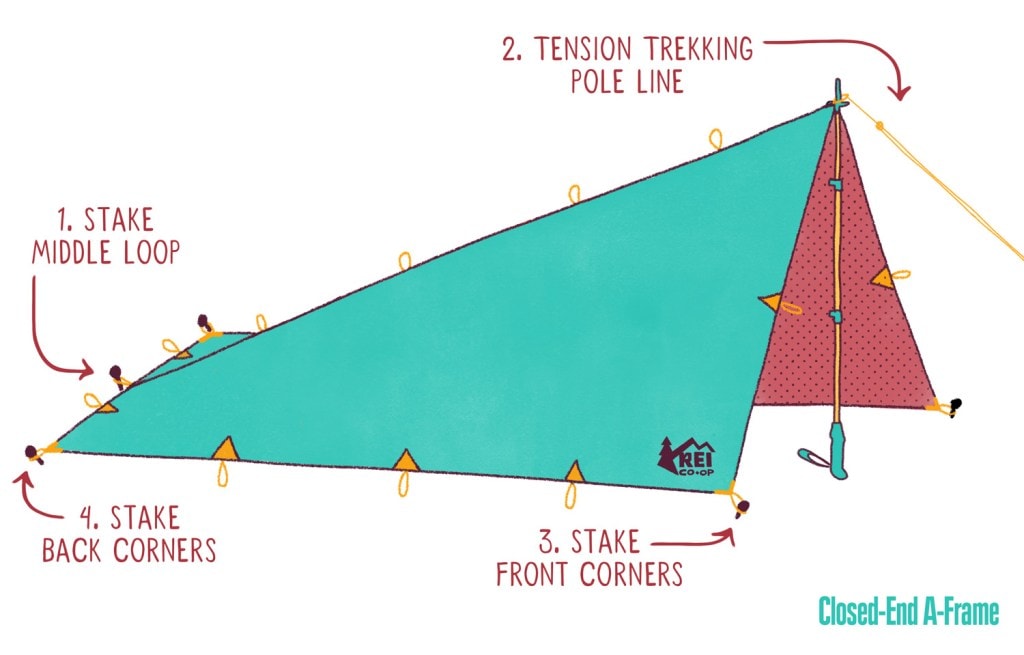
Step-by-Step: Build Your Rain-Proof Fortress in 10 Minutes
Grab an 8×10 or 10×12 ft tarp (silnylon or Dyneema for zero leaks). No trees? Use trekking poles.
- Site pick: Face the open end away from wind. Avoid low spots—flash floods kill.
- Ridgeline: Tie 15-20 ft paracord between two trees at chest height, 8-10 ft apart.
- Drape tarp: Center over ridgeline. Pull tight for that 45-60° V-shape.
- Stake sides: Hammer 6-8 stakes, pull guylines at 45° angles for drum-tight tension.
- Close the end: Fold back end down, stake corners and midpoints. Boom—sealed.
- Door flap: Leave front loose or tie a stick across for easy in/out.
- Groundsheet: Plastic sheet or extra tarp underneath.
Total weight: Under 2 lbs. Cost: $20-100.
Pro move: Add a prusik hitch on the ridgeline to adjust pitch on the fly.
Essential Gear List
- Tarp: 10×12 ft, 20D silnylon (e.g., Aqua Quest). Waterproof rating: 2000mm+.
- Cord: 50 ft paracord.
- Stakes: 8 titanium Y-stakes.
- Poles: 2 trekking poles (48-60″).
- Extras: Groundsheet, bivy sack for condensation.
Pack it all in a 1L bag.
Head-to-Head: How It Stacks Up
| Shelter Type | Rain Shedding | Wind Block | Setup Time | Space (1 Person) | Best For |
|---|---|---|---|---|---|
| Closed A-Frame | ★★★★★ | ★★★★★ | 10 min | Excellent | Heavy rain storms |
| Lean-To | ★★★ | ★★ | 5 min | Good | Fire + light rain |
| Diamond | ★★★★ | ★★★ | 8 min | Fair | Hammocks, calm rain |
| Mini-Mid (Pyramid) | ★★★★★ | ★★★★★ | 15 min | Tight | Exposed ridges |
| Open A-Frame | ★★★★ | ★★★ | 7 min | Excellent | Moderate rain |
Winner: A-frame for 90% of scenarios—simple, effective, scalable.
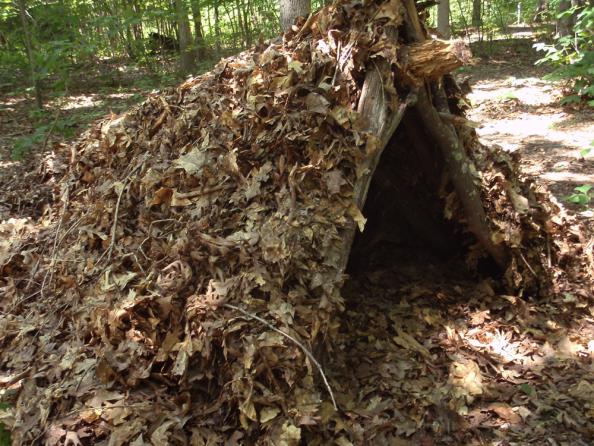
No Tarp? Go Primitive: The Leaf Hut
Stranded gearless? Build a leaf hut—A-frame frame buried in 2-3 ft of leaves/ferns.
- Why it works: Thick debris insulates and sheds rain like thatch. Survived weeks on Alone.
- Build: Long ridgepole, ribbed frame, pile vegetation thick.
- Time: 1-2 hours. Dry inside guaranteed.
Perfect for true survival.
Survival Skills: How to Build a Leaf Hut Shelter
7 Battle-Tested Tips for Monsoon-Proofing Any Shelter
- Tension is king: Saggy tarp = puddle city. Tight as a drum.
- Orient right: Open end leeward—rain follows wind.
- Layer up: Tarp over bough bed keeps ground moisture out.
- Vent smart: Crack door for airflow, fight condensation.
- Backup plan: Emergency bivy inside for hypothermia hedge.
- Test it: Pour water on before sleeping.
- Site hacks: Under thick canopy cuts 70% rain.
Mistakes That’ll Soak You (And How to Dodge Them)
- Too shallow pitch: Fix: 45° min.
- Loose stakes: Rocks > dirt in wind.
- No groundsheet: Wet butt = misery.
- Wrong size tarp: Too small = exposed feet.
FAQs
Q: What if winds hit 50 mph? A: Drop lower, add poles, face into wind. Still holds.
Q: Best tarp material? A: Dyneema—light, no sag when wet.
Q: Solo vs. group? A: Scale up: 12×16 ft for 4 people.
Q: Hot climates with rain? A: Same setup, higher pitch for breeze.
Q: Cost to start? A: $50 DIY.
Wrapping Up: Stay Dry, Stay Alive
In heavy rain, seconds count. Master the closed-end A-frame—you’ll sleep sound while storms rage. It’s not fancy, but it’s foolproof.