How Do I Plan a Safe Route and Prepare for Backcountry Trips?
To plan a safe route and prepare for backcountry trips, start by defining your trip’s basics like location, duration, and group size, then research conditions such as weather, terrain, and hazards. Choose a route that matches your fitness level using maps and apps, secure permits, pack essential gear including the ten essentials, plan food and water, share your itinerary with someone, and practice Leave No Trace to minimize impact. Always check for updates on trail conditions and be ready to adjust plans for safety.
Understanding Backcountry Trips
Backcountry trips take you into remote wilderness areas, far from roads and crowds, where self-reliance is key. These adventures can range from overnight hikes to multi-week treks through national parks, forests, or wild lands. People head out for the solitude, stunning views, and challenge, but the isolation means help isn’t close by if things go wrong.
What draws folks in? For many, it’s the escape from daily life and the chance to connect with nature on a deeper level. Popular spots like the Wind River Range in Wyoming or the Sierra Nevada in California see heavy use because of their dramatic landscapes and well-documented routes. But popularity also means more competition for permits and campsites, so early planning pays off.
Logic here is simple: Knowing what a backcountry trip involves helps set realistic expectations. If you’re new, starting small builds confidence and skills, reducing the odds of mishaps.
Why Safety Comes First in Backcountry Planning
Heading into the backcountry without solid prep can turn risky fast. Data from the National Outdoor Leadership School (NOLS) shows that soft-tissue injuries like blisters and sprains make up a big chunk of incidents—over half in some reports—often from poor planning or overexertion. On the more serious side, avalanches claim an average of 27 lives each winter in the U.S., mostly among backcountry skiers and snowmobilers, but hikers face similar threats in snowy seasons.
Other common hazards include getting lost, wildlife encounters, or weather shifts leading to hypothermia. A study on ski touring injuries pegged the rate at about 3 per 1,000 hours in frontcountry areas, highlighting how even shorter outings carry risks.
The point? Safety isn’t just about gear—it’s about smart decisions upfront. By planning routes with known water sources and avoiding high-risk zones, you cut down on emergencies. This approach has kept countless trips enjoyable rather than ending in rescue calls.
Step 1: Define Your Trip Parameters
Before picking a spot, nail down the basics. Ask yourself: Where do you want to go? How long can you be out? Who’s coming along?
For example, if time is short, stick close to home to spend more hours on the trail instead of driving. Solo trips offer flexibility, but groups can share loads like tents, making heavy packs lighter. Consider your goals—training for a bigger hike or just unwinding?
This step validates itself because mismatched parameters lead to frustration or danger. A beginner tackling a 20-mile day with steep climbs might bail early, while a well-fitted plan keeps everyone moving steadily.
Use a simple document to jot these down, like a “Trip Planner” with dates, goals, and logistics. Share it with a contact back home for that extra safety net.
Step 2: Research Your Destination
Once parameters are set, dive into details. Look at guidebooks, websites like AllTrails or Gaia GPS, and recent trip reports for insights on trails, difficulty, and features.
Talk to locals or rangers for the latest on conditions—streams might dry up, or trails could close due to fires. Word-of-mouth from hiking clubs or store staff often uncovers hidden gems or warnings.
Why this matters: Popular advice emphasizes starting with easier spots near home, like a state park loop, to build experience. Research shows that unfamiliar terrain boosts injury risks, so knowing the lay of the land lets you pick spots with reliable water and moderate elevation—say, under a few hundred feet of gain for starters.
Step 3: Plan Your Route in Detail

A topographic map showing a backcountry route with elevation contours and landmarks.
Route planning turns a vague idea into a solid path. Start with topo maps to spot campsites, water points, and tough sections like steep climbs.
Aim for 3-10 miles per day based on your pace, factoring in elevation and pack weight. For point-to-point hikes, arrange shuttles or cars at both ends.
Tools like CalTopo or apps help layer in weather forecasts and real-time data. Off-trail routes need extra care—study vegetation, footing, and hazards to avoid getting stuck.
This logic holds because a well-planned route matches your fitness, preventing exhaustion. Flexible daily goals, like a range of miles, allow for adjustments if weather hits.

Digital mapping tool interface for planning backcountry routes with layers for terrain and weather.
Step 4: Secure Permits and Check Regulations
Many wilderness areas require permits to control crowds and protect the land. Apply early—some spots use lotteries months in advance.
Check rules on campfires, group sizes, or dog policies. Federal lands like national forests often have specific guidelines.
Failing this step can derail your trip at the trailhead. It’s popular advice because overused areas suffer without limits, and permits ensure you’re legal and informed about closures.
Step 5: Assess Fitness and Build Skills
Get in shape with day hikes carrying a loaded pack—aim for 30+ pounds to mimic the real thing. Practice skills like map reading, tent setup, and water filtering at home or on short overnights.
If you’re new, a “shakeout” hike tests everything without big commitments.
This preparation makes sense: Fitness mismatches cause most pullouts, and skills like navigation prevent getting lost, a top hazard.
Step 6: Pack Essential Gear
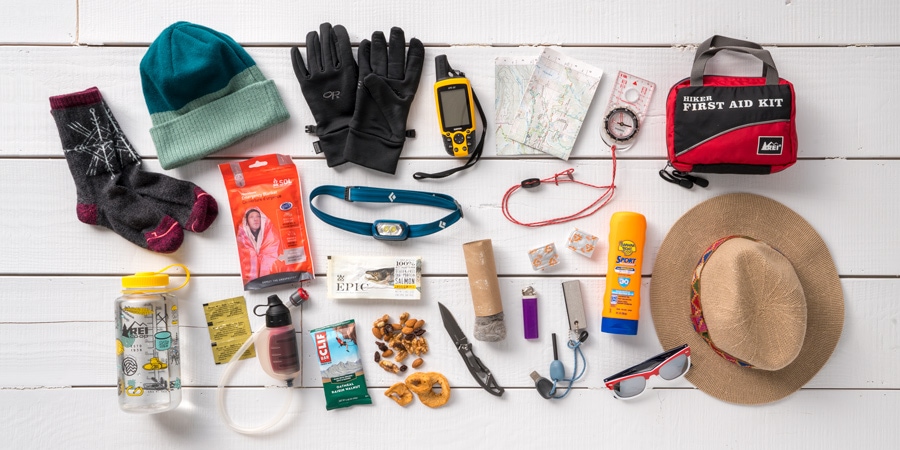
Layout of the ten essentials including navigation tools, first aid, and insulation.
Your pack should weigh no more than 20% of your body weight. Focus on the ten essentials:
- Navigation: Map, compass, GPS device.
- Sun protection: Sunglasses, sunscreen, hat.
- Insulation: Extra layers, rain gear.
- Illumination: Headlamp with extra batteries.
- First-aid supplies: Bandages, meds, tweezers.
- Fire: Waterproof matches, lighter.
- Repair kit and tools: Knife, duct tape.
- Nutrition: Extra food.
- Hydration: Extra water or purifier.
- Emergency shelter: Tarp or bivy.
Add trip-specific items like bear canisters in grizzly country or insect nets in buggy areas.
Why this list? It’s battle-tested by experts and covers surprises like weather changes or minor injuries, keeping small issues from becoming big ones.

Illustrated guide to the ten hiking essentials with labels.
Step 7: Plan Food and Water
Pack 2,500-4,500 calories per day in lightweight foods—think trail mix, energy bars, and dehydrated meals. Include extras for an unplanned day.
For water, map sources and carry a filter or purifier. In dry areas, cache supplies if allowed.
This is crucial because dehydration hits fast in the backcountry, and proper fueling maintains energy for the route. Testing meals beforehand avoids surprises like disliked flavors.
Step 8: Prepare for Weather and Common Hazards
Check 5-day forecasts and pack for the worst—layers beat cotton, which holds moisture and chills you.
Common hazards? Wildlife: Hang food high or use canisters. Weather: Avoid ridges in storms to dodge lightning. Injuries: Watch for blisters by breaking in boots and treating hot spots early.
Logic: Weather causes many evacuations, so adaptability—like turning back—saves trips. Research shows prevention, like sturdy boots and poles, cuts sprain risks.
Step 9: Emergency Planning
Leave a detailed itinerary with a trusted person, including return time and who to call if you’re late.
Carry a personal locator beacon or satellite messenger for spots without cell service.
First-aid knowledge is key—learn basics like treating sprains or hypothermia. Evacuate for serious signs like high fever or unusable limbs.
This step’s value? It turns potential disasters into manageable situations, as quick response can be lifesaving in remote areas.
Step 10: Follow Leave No Trace Principles
![7 Principles of Leave No Trace [Infographic] - Earth River SUP](https://www.earthriversup.com/wp-content/uploads/LNT-FACE.jpg)
Infographic outlining the seven Leave No Trace principles with visuals and explanations.
To keep wilderness pristine, stick to these seven principles:
- Plan ahead and prepare: Know regulations to avoid issues.
- Travel and camp on durable surfaces: Stick to trails and established sites.
- Dispose of waste properly: Pack out trash, bury human waste 6-8 inches deep.
- Leave what you find: Don’t take rocks or artifacts.
- Minimize campfire impacts: Use stoves instead, or existing rings.
- Respect wildlife: Observe from afar, store food securely.
- Be considerate of other visitors: Keep noise down, yield on trails.
These rules are popular because they preserve spots for everyone. Overuse without them leads to erosion and closures, so following ensures future access.
Final Checks Before Heading Out
Double-check gear, weather, and the pack—remove extras to lighten up. Share updates if plans change.
A test pack and weigh-in helps spot overloads. This wrap-up confirms you’re set, turning planning into action.