How to Improvise Shelter in Heavy Rain: Essential Survival Strategies to Stay Dry and Safe
When heavy rain hits and you’re caught outdoors without proper gear, improvising a shelter quickly can mean the difference between staying dry and facing hypothermia. The exact way to do this starts with assessing your location and available materials. If you have a tarp or poncho, tie it between trees or poles in an A-frame or lean-to configuration, sloping it at least 45 degrees to shed water, and stake the edges low to block wind-driven rain. Without man-made items, use natural materials like branches for a frame, layered with leaves, grass, or bark to create a waterproof barrier—build a debris hut by piling leaves thickly over a ridgepole structure. Always elevate your sleeping area with dry foliage to avoid ground moisture, and position the opening away from prevailing winds.
Why Improvising Shelter Matters in Heavy Rain
Getting soaked in heavy rain isn’t just uncomfortable; it can lead to serious health risks. Your body loses heat 25 times faster when wet, making hypothermia a real threat even in mild temperatures. That’s why survival experts emphasize shelter as the top priority in wet conditions, ahead of fire or food. In forested areas, where most outdoor emergencies happen, quick improvisation using what’s around you can keep you protected until help arrives or the storm passes.
This approach draws from time-tested bushcraft techniques popular among hikers, campers, and survivalists. For instance, many outdoor enthusiasts on platforms like Reddit’s r/Survival stress that a well-built improvised shelter not only blocks rain but also retains body heat, turning a miserable situation into a manageable one. The logic here is simple: rain reduces visibility and mobility, so staying put under cover preserves energy and prevents accidents like slips on muddy terrain.
Assessing Your Environment Before Building
Before you start gathering materials, take a moment to evaluate your surroundings. Look for high ground to avoid flash flooding—valleys and low spots can turn into streams during heavy downpours. Natural features like fallen trees or rock overhangs can serve as ready-made bases, cutting your build time in half.
Popular advice from survival guides highlights choosing spots with natural windbreaks, such as dense brush or hillsides. This makes sense because wind can drive rain sideways, undermining even the best roof. If you’re in a group, assign tasks: one person scouts for materials while another clears the site. Solo? Prioritize speed over perfection—aim to have basic cover up in under 30 minutes.
Consider the weather’s direction too. Rain often comes with wind from a specific angle, so orient your shelter’s opening leeward. This tactic, shared widely in bushcraft communities, ensures rain doesn’t blow inside, keeping your interior dry.
Using Man-Made Materials for Quick Protection

An example of a simple tarp shelter setup in rainy conditions, using trees for support.
If you have access to a tarp, poncho, or even a large garbage bag, these are gold for improvising shelter. Tarps are lightweight and versatile, making them a favorite among ultralight backpackers. A basic setup involves stringing a ridgeline between two trees and draping the tarp over it, securing the corners with stakes or rocks.
One popular configuration is the A-frame: pull the tarp taut along the ridgeline, then peg the sides down close to the ground. This creates a steep slope that lets water run off easily, preventing pooling. Why does this work so well? The angle—ideally 45 degrees or steeper—uses gravity to shed rain, much like a house roof. In heavy winds, lower the sides further to reduce flapping, which can tear the material.
Another go-to is the lean-to: prop one edge high against a tree or pole, and angle the other to the ground. This provides an open front for a fire, which is crucial in rain to dry gear and warm up. Bushcraft videos often show this setup holding up in storms, as it allows ventilation while blocking precipitation. If cordage is scarce, use shoelaces or vines to tie off.
For those without a full tarp, improvise with what you carry. A rain jacket stretched between branches can cover your upper body, or bunch multiple items together. The key logic: man-made materials are waterproof by design, so they outperform natural ones in speed and reliability when time is short.
Advanced Tarp Setups for Harsh Conditions
In really bad weather, try a fully enclosed tarp shelter. Fold one end under to create a floor, then seal the sides with clips or ties. This setup, praised in outdoor forums, turns your tarp into a mini tent, protecting against ground moisture and insects.
Or, for high winds, peg one side directly to the ground and prop the other with sticks—this “plow point” design minimizes exposure. It’s a favorite for solo campers because it uses less space and materials. Always test your setup before the rain worsens; a quick shake can reveal weak points.
Building with Natural Materials When Nothing Else is Available
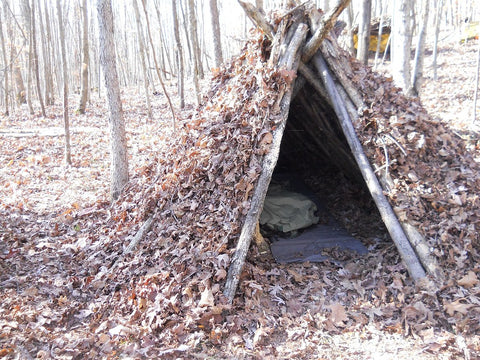
A debris shelter made from leaves and branches, ideal for forested areas.
No tarp? Turn to nature. Start with a sturdy frame: find a long ridgepole and lean it against a tree or rock at waist height. Then, stack smaller branches against it to form walls. The debris hut is a classic here—pile leaves, grass, and pine needles at least two feet thick over the frame for insulation and waterproofing.
Why pile so much? Thin layers let water seep through, but thick debris creates air pockets that trap heat and repel moisture, like shingles on a roof. In rainy forests, this method is popular because materials are abundant—evergreen boughs work best as they naturally shed water.
For a quicker option, use a fallen tree as your base. Pile branches and foliage on the leeward side to create a windbreak. Survivalists note that this “impromptu shelter” can be ready in minutes and provides decent protection if layered properly. Logic dictates using what’s plentiful: in leafy areas, go for debris; in rocky terrain, stack stones for walls.
Insulate the floor too—wet ground saps heat fast. A bed of dry leaves or ferns keeps you off the damp earth. If available, bark from birch trees makes excellent roofing, as it’s naturally water-resistant.
Popular Natural Shelter Designs
The A-frame debris shelter stands out for its simplicity: two forked branches support the ridgepole, with ribs leaning in. Cover with thatch starting from the bottom up, overlapping like tiles.

An A-frame bushcraft shelter, showing the basic frame before adding debris.
This design, seen in many bushcraft tutorials, channels rain away efficiently.
Circular shelters, like tepees, offer more space but take longer. Use long poles tied at the top, then wrap with bark or vines. They’re sturdy in wind and rain, as the conical shape distributes weight evenly. In snowy or rainy climates, this is a top choice for long-term stays.
Common Mistakes to Avoid and How to Fix Them

Illustrating a common error: inadequate roofing leading to leaks.
Many people skimp on materials, leading to leaky roofs. Fix this by layering debris thicker than you think—aim for arm-deep coverage. Flat roofs are another pitfall; they pool water and collapse. Always slope at 45 degrees or more.
Poor ventilation traps moisture inside, causing condensation. Leave small gaps or an open front to let air flow. Building too big wastes energy—keep it snug to retain heat.
Ignoring site selection invites flooding. Avoid depressions; scout for slight elevations. And don’t forget to secure everything—unstaked tarps flap away in wind.
These errors, common in beginner stories shared online, stem from rushing. Take time to plan, and your shelter will hold.
Extra Survival Tips for Handling Heavy Rain Outdoors
Beyond shelter, layer clothing to stay dry—quick-dry synthetics under waterproof outerwear. Pack extra socks; wet feet lead to blisters.
For fire, collect tinder before rain soaks everything. Fatwood from pine stumps ignites even wet. Position it under your shelter’s edge for warmth without smoke buildup.
Stay hydrated but purify water—rain collects contaminants. Boil or filter runoff. And signal for help if needed; bright tarps make you visible.
These tips, drawn from experienced hikers, ensure you not only survive but thrive in rain.
Wrapping It Up: Be Prepared and Practice
Improvising shelter in heavy rain boils down to using what you have wisely. Practice these setups in good weather to build confidence. With the right approach, you’ll turn a downpour into just another adventure.