How Can I Start a Fire Without Matches or a Lighter?
You can start a fire without matches or a lighter by using friction to create heat and embers, like with a bow drill or hand drill; striking sparks with flint and steel; focusing sunlight through a lens such as a magnifying glass or even a water-filled bag; generating sparks electrically with a battery and steel wool or gum wrapper; or triggering a chemical reaction with substances like potassium permanganate and glycerin. Pick the method based on what you have around—friction works anywhere with wood, while lenses need sunshine.
Why Learn These Skills?
Knowing how to spark a fire from scratch isn’t just for survival buffs. It comes in handy during camping trips when gear fails, power outages that leave you in the cold, or even backyard experiments. Popular survival shows like “Alone” and “Survivorman” often highlight these techniques because they build confidence in tough spots. Plus, with more people heading outdoors—over 50 million Americans camped in 2023 according to the Outdoor Industry Association—these skills are trending for safety and fun.
The key is preparation and patience. Most methods rely on dry materials and steady effort. We’ll break it down step by step, covering popular approaches and why they make sense in different scenarios.
Safety Comes First
Before trying any method, clear a safe spot: a circle of bare ground at least 10 feet from tents, trees, or dry grass. Have water, sand, or a fire extinguisher ready to douse flames. Wear gloves if handling hot items, and avoid windy days that could spread fire. Kids should always have adult supervision—these aren’t play tricks. Remember, wildfires start easily; check local burn bans.
Logic here is simple: Fire is a tool, but uncontrolled, it’s dangerous. Methods like chemical reactions can flare up fast, so stepping back prevents burns.
Gather Your Basics: Tinder, Kindling, and Fuel
No matter the method, you need three things to build a fire:
- Tinder: Fine, dry stuff that catches spark easily—like dry grass, birch bark, or cotton balls. It turns embers into flames.
- Kindling: Small twigs or sticks (pencil-thin) to grow the flame.
- Fuel: Larger logs to keep it going.
Why this setup? A spark alone won’t light big wood; you build up gradually. Collect double what you think you’ll need, especially in damp weather. Dry everything under your shirt if it’s wet.
Friction Methods: Back to Basics
These are the go-to for true wilderness scenarios because you can improvise with sticks and effort. They’re popular in bushcraft circles since they don’t require gadgets—just skill and dry wood. Softwoods like cedar or willow work best as they heat up quicker without splintering.

A diagram showing the parts of a bow drill setup.
Bow Drill: Reliable and Efficient
The bow drill tops many survival lists because it lets you spin wood fast without tiring your hands as much as other friction tricks. It’s featured in countless tutorials for its balance of speed and control.
Materials:
- A flexible branch for the bow (arm-length).
- String (shoelace, cord, or vine).
- Straight spindle stick (thumb-thick, foot-long).
- Flat fireboard wood.
- Socket (rock or wood block).
- Tinder nest.
Steps:
- Tie the string taut on the bow.
- Carve a notch in the fireboard and a small divot next to it.
- Place bark under the notch to catch embers.
- Loop the string around the spindle, set one end in the divot, and press the socket on top.
- Saw the bow back and forth to spin the spindle—keep steady pressure.
- When smoke appears and an ember forms (usually 5-10 minutes), tap it onto the bark.
- Move to your tinder nest and blow gently to flame up.
Why it works: The bow creates rapid friction, heating wood dust to 800°F, hot enough for embers. Practice makes it quicker; beginners might take longer, but it’s logical for group efforts.
Hand Drill: Simple but Demanding
This one’s pure grit—no tools beyond wood. It’s a favorite in primitive skills classes because it’s straightforward, though exhausting.
Materials:
- Long, straight spindle (2 feet).
- Fireboard.
- Tinder.
Steps:
- Cut a V-notch and divot in the fireboard.
- Put bark underneath.
- Roll the spindle between your palms, pressing down while sliding hands down repeatedly.
- Build speed until embers form (20-30 minutes for newbies).
- Transfer and blow to ignite.
Logic: Constant rubbing grinds wood into hot powder. It’s popular for minimalism, but save it for when you lack string—your hands will blister without calluses.
Fire Plough: Easy to Set Up
Less common but handy for quick tries, this method’s seen in tropical survival guides where straight wood abounds.
Materials:
- Baseboard with groove.
- Pointed plough stick.
- Tinder.
Steps:
- Carve a straight groove in the base.
- Rub the plough tip up and down the groove vigorously.
- Embers collect at the end—blow them into tinder (10-20 minutes).
Why logical: The plough focuses friction in one line, pushing hot dust forward. It’s less tiring than hand drills for short bursts.
Percussion Methods: Sparks from Strikes
Striking methods are beloved by hikers because they’re compact and work in wet conditions if you have char cloth. Flint and steel kits are bestsellers on outdoor sites for reliability.

A flint and steel fire starter kit.
Flint and Steel: Classic Spark Maker
This old-school trick dates back centuries and is a staple in historical reenactments.
Materials:
- Flint rock (or quartz).
- Steel striker (knife back works).
- Char cloth or dry fungus.
- Tinder.
Steps:
- Hold flint with char cloth on top.
- Strike steel downward to shower sparks onto the cloth.
- When it glows, fold into tinder and blow (seconds to minutes).
Logic: Hard strikes shave hot metal bits that ignite at 2,500°F. It’s fast once sparked, making it popular for emergencies.
Add char cloth for easier catches—it’s cotton charred in a tin.
Solar Methods: Harness the Sun
These shine on clear days and are hits in desert survival stories. They require no effort beyond holding steady, which is why kids love experimenting with them.
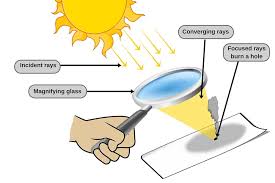
Using a magnifying glass to focus sunlight on tinder.
Magnifying Glass or Lenses
Eyeglasses or binoculars work too—common in everyday kits.
Materials:
- Lens.
- Tinder.
Steps:
- Angle lens to focus sun into a pinpoint on tinder.
- Hold until smoke, then flame (5-15 minutes).
- Add water drops for intensity.
Why it works: Concentrated rays hit 900°F. Logical for sunny spots, but useless at night.
Water-Filled Items: Bag, Balloon, or Condom
Improvise a lens with clear plastic and liquid.
Materials:
- Clear bag/balloon/condom.
- Water.
- Tinder.
Steps:
- Fill and shape into a sphere.
- Focus sun through it onto tinder (similar time as glass).
Logic: Water bends light like glass. Popular hack for when you forget tools—condoms are in many first-aid kits.
Ice Lens: Winter Wonder
Turn frozen water into fire.
Materials:
- Clear ice chunk.
- Knife.
- Tinder.
Steps:
- Shape ice into lens (thick center).
- Polish with hands.
- Focus sun (10-20 minutes).
Why sensible: In snow, it’s abundant. Clear ice avoids scattering light.
Soda Can and Chocolate: Polish to Shine
A fun urban myth turned real.
Materials:
- Can bottom.
- Chocolate/toothpaste.
- Tinder.
Steps:
- Polish can with chocolate for mirror finish.
- Reflect sun to pinpoint (15 minutes).
Logic: Parabolic shape focuses rays. Great for trash-found items.
Electrical Methods: Modern Sparks
These are favorites for car kits or home emergencies since batteries are everywhere.

Igniting steel wool with a battery.
Battery and Steel Wool
Quick and dramatic—seen in science demos.
Materials:
- 9-volt battery (or AA).
- Fine steel wool.
- Tinder.
Steps:
- Stretch wool thin.
- Touch battery terminals to it— it glows and burns.
- Transfer to tinder (seconds).
Why it works: Current heats wool to ignition. Logical for indoor starts.
Battery and Gum Wrapper
Foil from gum or chips works.
Materials:
- Battery.
- Foil wrapper.
- Tinder.
Steps:
- Cut foil into strip, narrow in middle.
- Touch ends to battery poles—center ignites.
- Move to tinder fast.
Logic: Narrow spot resists current, overheating. Popular party trick turned survival hack.
Chemical Methods: Quick Reactions
Reserved for prepared kits, these are less common but explosive in effect.
Potassium Permanganate and Glycerin
From chemistry sets.
Materials:
- Potassium permanganate.
- Glycerin (or sugar).
- Tinder.
Steps:
- Mix equal parts on rock.
- Wait or add water—flames in minutes.
- Step back.
Why logical: Oxidation reaction hits 400°F. For labs or advanced preppers.
Other Handy Techniques
Fire Piston: Compression Heat
Ancient but effective.
Materials:
- Piston tube.
- Tinder.
Steps:
- Insert tinder.
- Slam plunger—air compresses to ignite.
- Transfer ember.
Logic: Like diesel engines, pressure creates heat. Niche but reliable.
Tips for Better Results
- Practice in good weather first.
- Keep materials dry—use body heat if needed.
- Blow gently; too hard scatters embers.
- Layer your fire: teepee shape for air flow.
- In wind, build a reflector wall.
These boost success rates, as pros swear by rehearsal.
Avoid These Common Pitfalls
- Wet wood: It steams, not burns.
- Rushing: Embers need nurturing.
- Wrong angle on lenses: Check the beam.
- No backup: Always have multiple methods.
Learning from mistakes keeps things safe.
Wrapping It Up
Starting a fire without modern tools connects you to age-old skills while prepping for real needs. Whether friction for wilderness or batteries for home, the right method fits your situation. Get out there and try—safely, of course.
References: Insights drawn from survival guides like The Art of Manliness, WikiHow, and Camping Survival. For videos, check YouTube channels on bushcraft.