How to Tie Survival Knots: Master These Essentials for the Trail, Camp, or Crisis
Whether you’re pitching a tent in a sudden downpour, rigging a quick shelter during a hike gone wrong, or lashing gear together in an emergency, knowing how to tie survival knots can make all the difference. These aren’t just old-school tricks—they’re practical skills that keep you safe and sorted when things get real.
Right up front, here’s the straight scoop on the seven most reliable survival knots you’ll want in your toolkit. Each one solves a specific problem, and I’ll break them down step by step later. For now, the quick hits:
- Bowline Knot: Creates a fixed loop that won’t tighten under pressure—perfect for securing a line around a tree or your waist in a pinch. Tie it by forming a small loop, passing the end through like a rabbit coming out of a hole, around the standing line, and back in.
- Square Knot (Reef Knot): Joins two ropes of similar thickness quickly for bundling firewood or first aid. Cross the ends right over left, then left over right, and pull tight.
- Clove Hitch: Fastens a rope to a pole or branch for hanging a lantern or starting a tripod. Wrap the rope around the object twice, crossing over, and tuck the end under.
- Two Half Hitches: Secures a line to an anchor point like a post for tarps or rescues. Loop the end around the standing line twice in the same direction and cinch down.
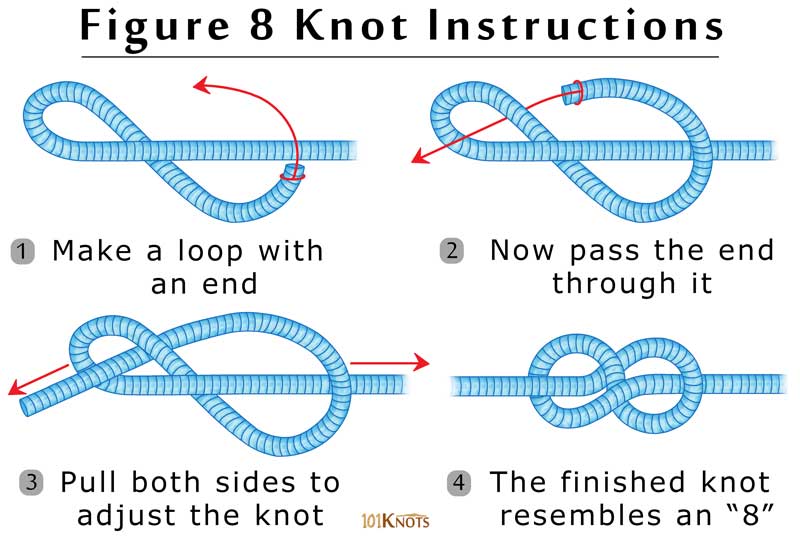
- Figure Eight Knot: A simple stopper to keep ropes from slipping through holes or rings—great for climbing or gear ties. Twist the end into a figure-eight shape and thread it back through the loop.
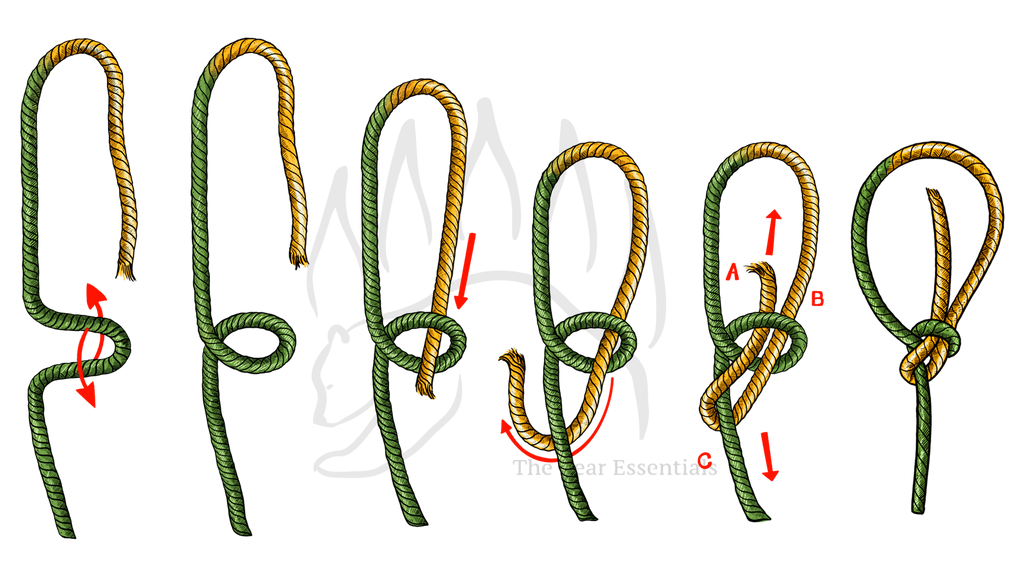
- Sheet Bend: Links ropes of different sizes, like paracord to shoelace, for extending lines in a bind. Form a U-bight in the thicker rope, pass the thinner end through, wrap it around, and tuck under itself.
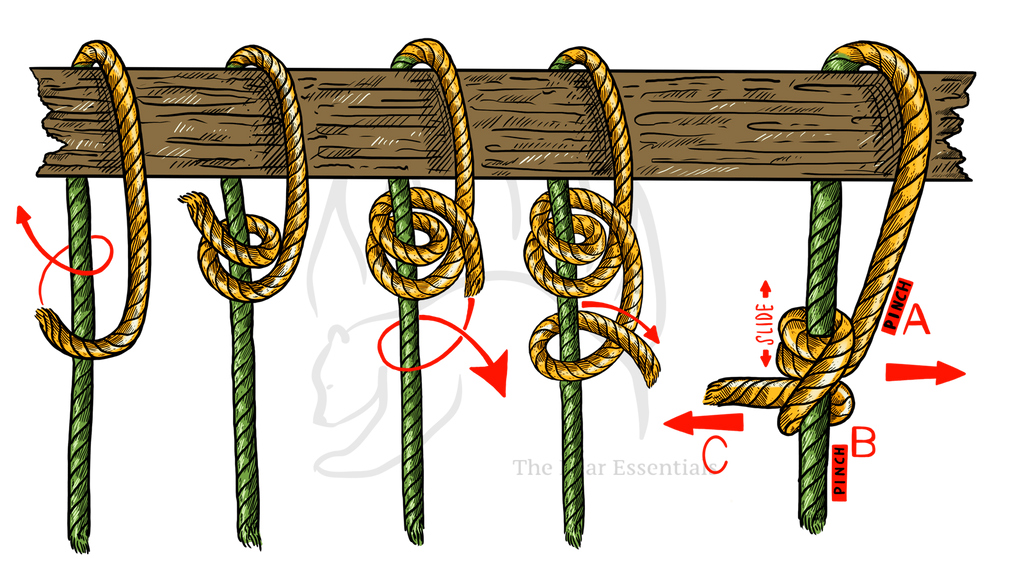
- Taut-Line Hitch: Adjusts tension on a line without retying—ideal for guy lines on tents. Wrap the end around the standing line twice, slipping loops for easy tweaks.
These knots cover 90% of what you’ll face outdoors or in a scrape. They’re simple, strong, and forgiving if you practice. Let’s dive deeper into why they matter and how to nail them.
Why Bother Learning Survival Knots? It’s Smarter Than You Think
Picture this: You’re miles from help, rain’s pouring, and your shelter’s sagging because that hasty knot just gave way. Sounds like a nightmare? It happens more than you’d guess. Knot-tying might seem like a dusty scout badge, but it’s a quiet game-changer for anyone who steps off the pavement.
First off, these knots turn random cordage into tools that save time and sanity. In the wild, they let you build a lean-to from branches and a tarp in minutes, snare a meal, or even hoist yourself out of a tricky spot. The American Red Cross calls it an “often-overlooked skill” that boosts your odds by letting you whip up shelters, traps, and fixes on the fly. No fancy gear required—just rope and know-how.
And the logic stacks up from every angle. For campers and hikers, it’s about efficiency: A good taut-line keeps your tent taut against wind without constant fiddling. Boaters swear by the bowline for docking lines that release easy under load. In emergencies—like after a storm knocks out power—folks use clove hitches to secure tarps over broken windows or bundle supplies. Prepper sites like The Prepared highlight how mastering just three knots preps you for “just about anything,” from bear bags to improvised harnesses.
What’s popular right now? Scroll through hiking forums or YouTube, and you’ll see bowline tutorials racking up millions of views—folks want quick wins that work in real dirt and weather. Stats are sparse because who tracks “knots saved my trip,” but survival experts agree: Poor knots lead to failed gear, wasted energy, and risks that snowball. One Outdoor Life roundup notes that knowing 20 basics “will keep you alive,” but seven gets you most of the way. Bottom line? It’s low-effort insurance. Spend an afternoon practicing, and you’re set for years of adventures or “what ifs.”
Gear Up: What You Need to Start Tying
Before you loop a single strand, grab the basics. Survival knots shine with everyday stuff—no need for boutique rope.
- Rope or Cordage: Start with 550 paracord (7-strand, tough as nails) or natural fibers like hemp for that backwoods feel. Aim for 20-50 feet to practice without running short. Why? Paracord’s inner strands double as fishing line or sutures if things go south.
- Practice Spot: A sturdy branch, fence post, or even your kitchen chair works. Outdoors beats indoors—feel the wind and grit to build muscle memory.
- Extras for Realism: Gloves for cold-weather ties, wet rope to mimic rain, or a timer to simulate stress.
Pro tip: Different ropes behave differently. Nylon slips more than cotton, so test a few. This variety keeps your skills sharp across scenarios, from dry trails to soggy swamps.
The Core Knots: Step-by-Step Guides
Here’s where the rubber meets the road. I’ll walk you through each knot with clear steps, uses tailored to popular setups like camping or emergencies, and why it holds up. These draw from tried-and-true methods that pros like Bear Grylls and bushcrafters rely on—logical because they’re battle-tested, not flashy.
1. The Bowline Knot: Your Go-To Fixed Loop
Ever need a loop that stays put no matter the pull? The bowline’s your anchor—think tying off a hammock to trees or looping a rope around a buddy for a river crossing. It’s king for rescues because it unties easy even after heavy strain, unlike slipknots that jam.
Why It Works Here: In hiking, it secures packs to branches overnight. For emergencies, it’s a hasty harness. Experts pick it first because it’s fast (under 10 seconds with practice) and failsafe.
How to Tie It:
- Form a small loop in the rope about a foot from the end—leave enough tail (6-8 inches).
- Pass the tail end up through the loop (like a rabbit popping out of its hole).
- Wrap the tail around the standing line (the “tree trunk”).
- Duck the tail back down through the original loop.
- Pull the standing line to tighten—the loop should sit snug, with the tail inside for safety.
Dress it neat: Flatten the loops so it looks like a bow tie. Test by yanking both ends.
2. Square Knot (Reef Knot): Quick Joins for Everyday Fixes
This one’s the workhorse for bundling—firewood stacks, injury wraps, or splicing short ropes. Popular in camping because it’s symmetric and releases without fuss, but skip it for load-bearing; it can capsize under uneven pull.
Why It Fits: Trail cooks use it for pot lids; preppers for sealing packs. It’s intuitive—right over left, left over right—mirroring how we tie shoes, so it sticks fast.
How to Tie It:
- Cross the right end over the left and tuck under to make a half-knot.
- Cross the left end (now on right) over the right and tuck under again.
- Pull all four ends to square it up—ends should exit opposite each other.
Logic check: If it looks lopsided, you’ve got a granny knot (common flub)—untie and flip the second cross.
3. Clove Hitch: Instant Anchor to Poles
Hang a lantern from a limb or start lashing poles for a shelter frame? Clove hitch grips round objects like magic, but add a half-hitch for permanence—it can slip if loaded one way only.
Why Popular: Hikers love it for quick setups; it’s in every tripod lashing vid. Versatile for urban fixes too, like securing a bike to a rack.
How to Tie It:
- Wrap the rope end around the pole, crossing over the standing line.
- Wrap again from the opposite side, crossing under.
- Tuck the working end under the second wrap.
- Pull tight against the pole.
For extra hold, slip the end through the final loop before pulling.

4. Two Half Hitches: Secure and Simple
Need to moor a line to a rock or tree? This hitch bites down under tension but shakes free easy. Campers use it for tarp ridgelines; it’s forgiving for beginners.
Why Logical: Builds on the basic overhand—two quick wraps—and scales for heavier loads by adding more.
How to Tie It:
- Pass the rope around your anchor.
- Loop the working end over and under the standing line for the first half-hitch.
- Repeat in the same direction for the second.
- Pull the standing line to cinch—the hitches should stack neatly.
Tweak: For slip-proof, tuck the tail through the last loop.
5. Figure Eight Knot: The Bulletproof Stopper
Ropes pulling through a carabiner or eyelet? This bad boy blocks it cold—essential for climbing belays or securing sails. It’s bulky on purpose, so it jams against edges.
Why It Ranks: Universally trusted; sailing and scouting staples. Visual learners dig the “8” shape—easy to inspect for errors.
How to Tie It:
- Twist the end over itself to form a loop.
- Pass the end under and around the standing line.
- Thread it back through the original loop from underneath.
- Pull to shape the “8”—trim excess if needed.
Pro move: Follow it with a tail stopper for doubles.
6. Sheet Bend: Bridging the Gap Between Ropes
Got mismatched cords—a fat hawser and thin twine? Sheet bend marries them strong, ideal for extending a clothesline or rigging a signal flag.
Why Essential: Handles unequal thicknesses where square knots balk. Boaters and anglers rave—it’s their go-to for leaders.
How to Tie It (Double for Extra Grip):
- Make a U-bight in the thicker rope.
- Pass the thinner end up through the U.
- Wrap it around the thick bight and under itself once.
- Repeat the wrap for the double version.
- Pull both standing ends—tails should exit the same side.
Validate: Tug sideways; if it shifts, redo the tucks.
7. Taut-Line Hitch: Tension on Demand
Guy lines going slack in the breeze? This adjustable hitch lets you dial it in without starting over—tent stakes, clotheslines, or windbreaks.
Why It Shines: One-way grip means easy tweaks; hikers call it the “lazy knot” for saving hassle.
How to Tie It:
- Wrap the working end around the standing line once, parallel.
- Loop it back over itself through the first wrap.
- Make a second loop beside the first, slipping under.
- Cinch by pulling the standing line—the working end slides for adjustments.
Under load? Slide the hitches up or down as needed.
Pitfalls to Dodge: Common Knot Fumbles and Fixes
Even pros slip up—here’s the dirt on what trips folks. Spot these, and you’re ahead.
- Granny Knot Mix-Up: Tying square knot wrong (both crosses same direction) makes it spill under pull. Fix: Alternate directions every time.
- Loose Dressing: Knots that look sloppy jam or weaken. Always flatten and pull all strands—even.
- Wrong Knot for the Job: Using bowline for joins? Nope—pick by purpose. Logic: Each knot’s strength matches its role, per bushcraft guides.
- Over-Tightening Tails: Short ends snag or snap. Leave 4-6 inches and test.
From forums, the biggie is rushing without checking—slow down, inspect, repeat.
Level Up: How to Practice Like a Pro
Mastery isn’t overnight, but smart reps make it stick. Start slow, build speed.
- Weekly Drills: Tie each knot 10 times a day for a month—use a YouTube timer. Why? Repetition wires your hands, per survival trainers.
- Mix It Up: Practice with wet, stiff, or thin ropes. Add wind or gloves for realism—mimics the trail.
- Scenario Play: Set up a mini-camp: Rig a tarp with taut-lines, lash poles with clove hitches. Time yourself.
- Under Pressure: Close your eyes or use one hand. Builds confidence for low-light emergencies.
Resources like Animated Knots site or Bear Grylls vids keep it fun—visuals speed learning 2x over reading alone.
Wrapping It Up: Knots Are Your Quiet Edge
Survival knots aren’t about being a rope wizard—they’re about that calm “I’ve got this” when chaos hits. From the bowline’s steady loop to the taut-line’s clever adjust, these seven cover the bases for camping coziness or crisis calm. Grab some cord, head outside, and tie away. You’ll wonder how you ever hiked without ’em.
Stay curious, stay tied in.