How to Build a Fire in Wet Conditions: Survival Secrets That Could Save Your Life
To build a fire in wet conditions, start by picking a sheltered spot out of the wind and rain, like under a thick evergreen or rock overhang. Gather dry tinder from protected places such as the inner bark of trees or dead branches still attached to trunks. Build a raised platform with sticks or bark to keep everything off the soggy ground. Use a reliable spark source like a ferro rod or waterproof matches to ignite your tinder bundle, then add pencil-thin kindling in a teepee shape. Once it’s going strong, stack larger fuel around the edges to dry it out before adding to the flames. Protect the early fire from moisture and keep feeding it steadily.
Introduction
Getting a fire going when everything around you is soaked can feel like an uphill battle, but it’s a skill that’s saved countless lives in the wilderness. Whether you’re camping after a storm, lost on a hike, or facing a survival situation, a fire provides warmth, a way to cook food, and even a signal for help. The key lies in preparation, smart material choices, and techniques that turn the odds in your favor. In this guide, we’ll break down every step, drawing from tried-and-true methods used by bushcrafters, hunters, and survival experts. You’ll learn not just the basics but also clever tricks that make the difference between shivering in the cold and basking in flames.
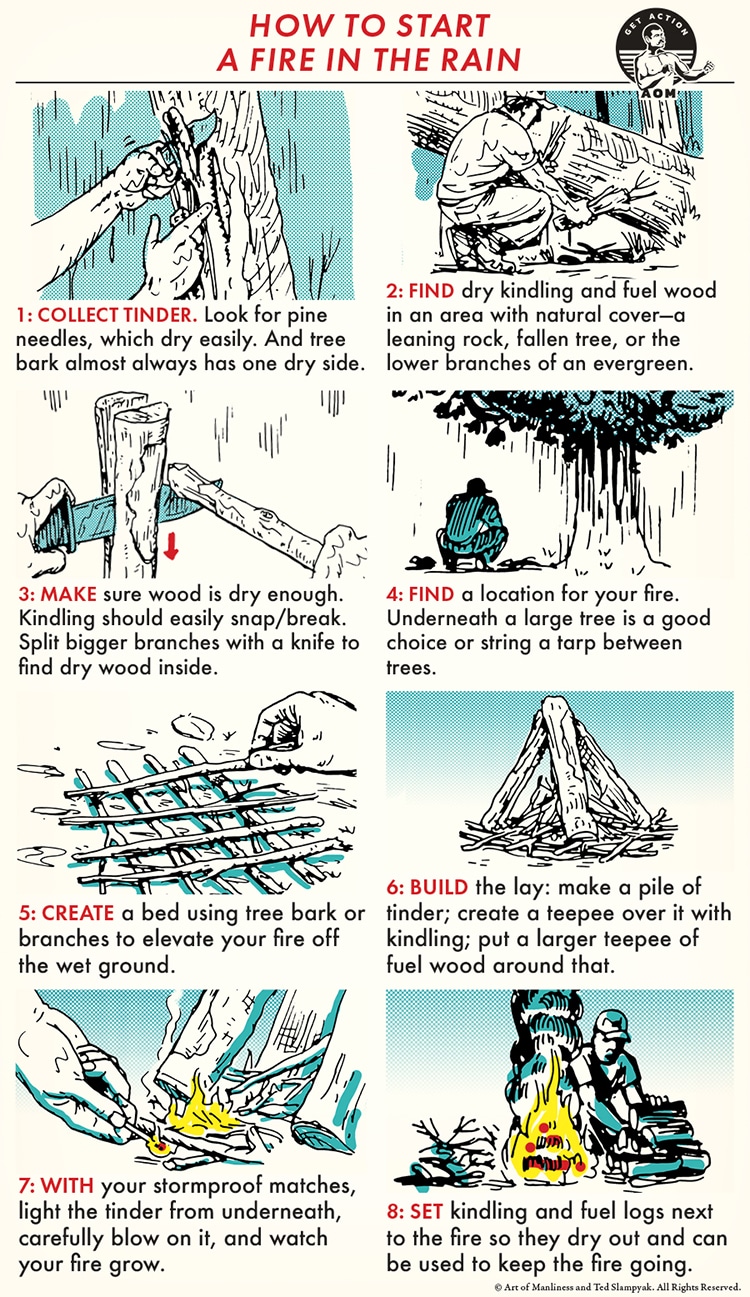
A step-by-step illustrated guide to starting a fire in the rain, showing key techniques like gathering tinder and building a teepee structure.
Why focus on wet conditions? Rain or snow complicates things because moisture saps heat and smothers sparks. But with the right approach, you can overcome that. Popular survival shows and forums like Reddit’s Bushcraft community highlight stories of people succeeding in pouring rain by focusing on dry cores in wood and building momentum with small flames. This isn’t about luck—it’s about logic and persistence.
The Challenges of Wet Weather Fires
Wet conditions throw up several roadblocks. Water conducts heat away from your materials, making ignition tougher. Ground that’s saturated pulls moisture into your tinder, and wind can snuff out fragile embers. In heavy rain, even finding anything dry seems impossible. Yet, understanding these issues helps you counter them.
For instance, wood on the forest floor absorbs water like a sponge, but standing dead trees or branches under canopy often stay drier inside. Survival experts point out that in rainforests, where annual rainfall hits 80-100 inches, locals split logs to reach the untouched center. That’s logical because bark acts as a barrier, protecting the heartwood. Cold adds another layer—hypothermia sets in fast when you’re wet, so a fire isn’t optional; it’s essential for drying clothes and boosting morale.
Popular angles from outdoor blogs emphasize mindset: don’t rush. A frantic attempt often fails, while methodical steps build success. Data from outdoor incident reports shows that failed fires contribute to many hypothermia cases in backcountry emergencies, underscoring why mastering this matters.
Preparing Your Fire Site
Your site sets the foundation. Look for natural shelter—a cliff face, dense tree cover, or even a tarp strung between branches if you have one. This keeps rain off while you work. Clear away wet leaves and debris to expose drier soil or rock. Avoid low spots where water pools; instead, opt for slight elevation.
Build a base to elevate your fire. Lay down larger sticks or flat bark in a raft-like platform. This prevents ground moisture from wicking up and allows air to flow underneath, feeding oxygen to the flames. Hunters in damp regions swear by this, as it also creates a bed of coals that radiates heat upward. If the ground is truly soggy, stack the platform higher—think Huck Finn’s raft in miniature.
Logic here is simple: fire needs air, heat, and fuel. By lifting it, you enhance airflow and isolate it from cold, wet earth. Skip the traditional fire pit; in rain, it fills with water, so a mound works better. Position your site with wind at your back to shield the flame without blowing it out.

Infographic outlining simple steps to ignite and maintain a fire in wet weather, including gathering dry materials and adding fuel gradually.
Gathering Materials: Tinder, Kindling, and Fuel
Materials are your lifeline. Start with tinder—the fluffy stuff that catches a spark easily. In wet woods, peel bark from birch or cedar; the inner layer is often dry and fibrous. Pine needles work too, especially if clustered under trees. If planning ahead, pack dryer lint or cotton balls soaked in petroleum jelly—these ignite even damp.
For kindling, snap pencil-sized twigs from dead branches still on trees—they’re less exposed to rain. Split them if needed to expose dry interiors. Fuel comes next: forearm-thick logs, again split for dry hearts. Look for “fatwood” from pine stumps; its resin burns hot and long, even wet.
Different angles shine here. Bushcrafters favor natural finds like dead standing wood, while preppers pack backups like paraffin wax. The logic? Diversity ensures options. Collect twice what you think you’ll need—wet wood burns faster once going. Tuck everything under your jacket to keep it dry during setup.
- Tinder tips: Shred inner bark into a bird’s nest shape for better spark catch.
- Kindling collection: Aim for brittle snaps; if it bends, it’s too green or wet.
- Fuel strategy: Stack wetter pieces around the fire’s edge to dry them passively.
Ignition Methods That Work in the Rain
Sparks fly easier with the right tools. Waterproof matches or a lighter are basics, but for reliability, use a ferrocerium rod—it throws hot sparks regardless of weather. Strike it into your tinder bundle, cupping hands to shield from wind.
Popular methods include the bow drill for primitive skills, but in wet conditions, it’s tough without dry components. Instead, many opt for commercial starters like magnesium blocks or fire putty, which burn intensely to dry surroundings. YouTube demos show knife-and-ferro combos succeeding in heavy downpours.
The reasoning: wet air needs hotter, longer-burning ignition to evaporate moisture. Blow gently on embers to fan them without scattering. If using steel wool, it ignites fast and hot, ideal for damp tinder. Test tools beforehand—nothing’s worse than a dud lighter in the rain.
Building and Maintaining the Fire
Structure matters. Form a teepee with kindling over your tinder, leaving space for air. Light at the base, letting flames climb. Once established, add fuel gradually—start small to build heat.
Maintain by stacking wet logs in a perimeter wall; the fire’s radiance dries them for later use. This creates a windbreak too. Keep the fire modest at first; a big blaze wastes fuel in wet woods. As coals form, they sustain even damp additions.
Logic validates this: gradual buildup generates enough heat to overcome moisture, turning wet fuel viable. Rotate logs to expose drier sides. If rain persists, lean a reflector like a space blanket behind to bounce heat back.

Visual guide from a Reddit post illustrating techniques for starting a fire in rainy conditions, emphasizing dry tinder and protection.
- Step-by-step build: Tinder nest, kindling teepee, fuel lean-to.
- Maintenance hacks: Poke coals for air; add oil-soaked string for boosts.
- Long-term: Bury embers overnight under ash for easy restart.
Common Mistakes to Avoid
Rookies often grab ground wood—it’s soaked, leading to failure. Don’t smother early flames with too much fuel; let it breathe. Ignoring wind direction scatters sparks, and building too big too soon fizzles out.
Forgetting backups is another pitfall. Always have multiple ignition sources. In cold, wet spots, not elevating the base dooms you to dampness. Logic? These errors ignore fire’s needs—address them, and success follows.
From forums, stories abound of near-misses fixed by splitting wood or using fatwood. Learn from them to stay safe.
Advanced Techniques and Tips
For pros, try the upside-down fire: layer large logs at bottom, kindling on top—burns downward, self-feeding in rain. Or use char cloth for primitive sparks. In snow, dig a trench for wind protection.
Popular among hunters: oil-dipped paracord as a wick. Indigenous methods from wet jungles involve resin-rich woods for sustained burns. These build on basics, adding efficiency.
- Wet wood workaround: Shave outer layers; inner is drier.
- Tool mods: Coat matches in wax for waterproofing.
- Eco angle: Use deadfall to minimize impact.
Safety First
Fires in wet areas can spread if conditions dry suddenly—clear a 10-foot radius. Watch for carbon monoxide in enclosed spots. Extinguish fully with water and dirt; stir ashes to ensure no embers linger.
Wear gloves to avoid burns, and keep kids or pets clear. In survival, signal with smoke if needed, but prioritize warmth. Safety logic: a controlled fire helps, an out-of-control one harms.
Conclusion
Mastering fire in wet conditions turns a daunting task into a reliable skill. By focusing on shelter, dry materials, elevation, and steady building, you’ll get flames roaring. Practice in your backyard during rain to build confidence. Remember, persistence pays off—many have survived worse with these methods. Stay prepared, and the wilderness becomes less intimidating.
References and further reading drawn from sources like Outdoor Life, Reddit Bushcraft threads, and Montana Knife Company blogs. For visuals, check illustrated guides from Art of Manliness.